Membership Website with ARMember 2023: A Complete Overview for Hospitality Providers
Welcome to our comprehensive tutorial on how to create a membership website for hospitality providers using the powerful ARMember plugin. This blog post will serve as a guide to accompany the above YouTube video tutorial. Our step-by-step tutorial will walk you through the entire process, ensuring you understand each aspect involved in setting up your hospitality-focused membership website.
Benefits of Membership Website
Creating a membership website for hospitality providers offers numerous advantages, helping you to enhance your online presence, boost customer loyalty, and drive business growth. In this tutorial, we will be utilizing the ARMember plugin, which boasts a wide array of features specifically designed to cater to the needs of hospitality providers. The following are some of the key benefits of setting up a membership website for your hospitality business:
Enhanced Customer Engagement
A membership website enables you to engage with your customers on a deeper level by providing exclusive content, offers, and services. This fosters a strong sense of community and loyalty among your clients, ultimately increasing retention and the likelihood of repeat business.
Increased Revenue Opportunities
You can tap into additional revenue streams by offering premium content and services to your members. This can include offering exclusive access to premium rooms, discounts on dining and spa services, or even organizing members-only events.
Streamlined Customer Experience
A membership website allows you to provide a personalized and seamless experience for your customers. From easy booking and payment processes to tailored content based on their preferences and membership level, you can significantly enhance your customers’ overall experience.
Improved Brand Loyalty
By providing value through exclusive content and personalized experiences, you strengthen your brand’s relationship with your customers. A membership website can help you cultivate brand loyalty, turning your customers into ambassadors who recommend your services to their friends and family.
Getting Started
To begin, you will need to choose a hosting provider and install the Kadence Theme, which we will customize to suit your branding and target audience.
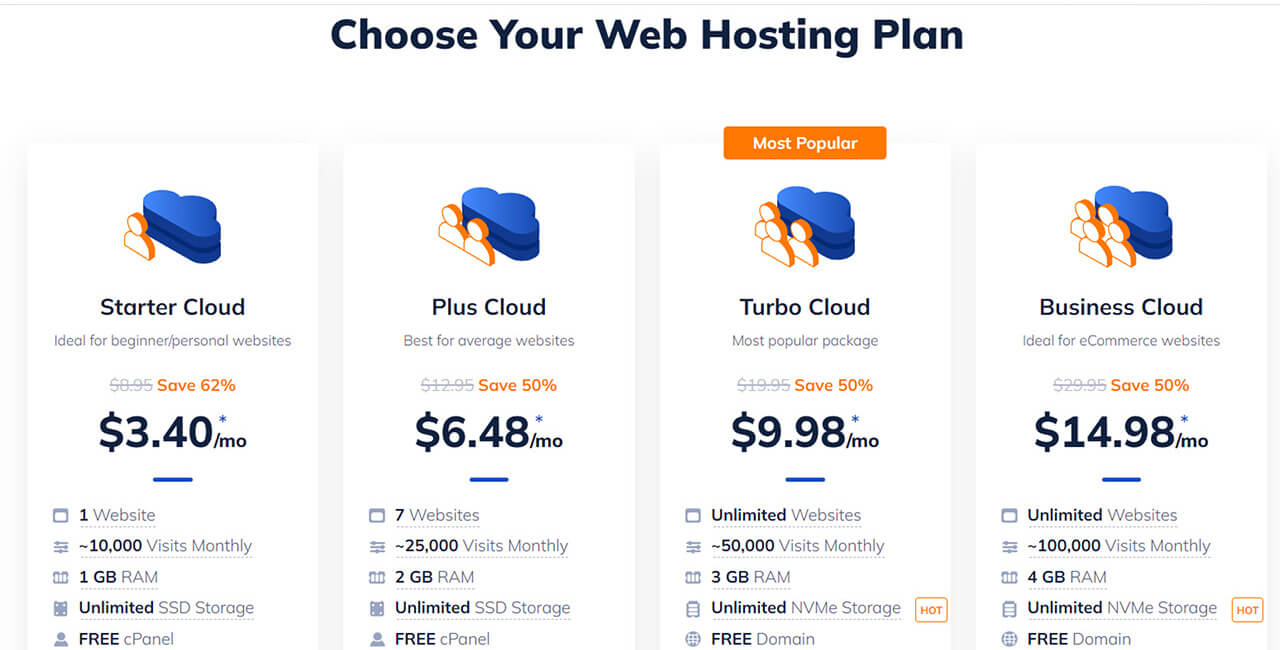
Recommended Hosting Providers
- NameHero: Name Hero also ensures their services are affordable for all budgets and offer 24/7 customer service so you can get help when you need it most.
- Siteground: Siteground provides reliable shared hosting for your booking or eCommerce Website. The installation process mostly clicks and goes
- Cloudways: Cloudways is a managed cloud server service where you choose the provider, and Cloudways connects its platform to it. You pay a monthly fee; in exchange, they will provide technical support when needed.
Recommended Tools
- ARMember: ARMember is a versatile and user-friendly freemium WordPress plugin designed to help you build and manage membership websites with ease. With no coding experience required, ARMember enables site owners to create various types of membership websites that cater to their specific needs.
- Presto Player: Presto Player is a cutting-edge video player plugin designed to help you optimize video content on your website. It is an ideal solution for coupling with a membership website, offering a range of features that cater to enthusiastic marketers, course creators, and anyone looking to enhance their website with video content. With Presto Player, you can engage visitors through interactive calls-to-action, track video performance with Google Analytics integration, and generate leads to grow your email marketing lists. For course creators, the plugin provides an exceptional learning experience with adjustable
- Kadence Theme: Kadence is a versatile, multipurpose WordPress theme suitable for various websites. It is available as a free download, with a pro version offering additional features and customization options to further enhance your website’s design and functionality.
Setting Up Your Membership Website
Our video tutorial covers a range of topics to ensure you completely understand setting up your membership website using ARMember. Below, we have outlined the key sections covered in the video tutorial.
Installing Kadence Starter Template
Getting started with Kadence Starter Templates is simple and free! Although some starter templates are exclusively for PRO users, a wide array of templates are available for free. If you prefer not to watch the video walkthrough, follow these steps with screenshots to begin building your digital empire with Kadence Starter Templates.
Note: It is recommended to start with a fresh WordPress installation before importing a starter template. The importer is designed for new or empty sites without content.
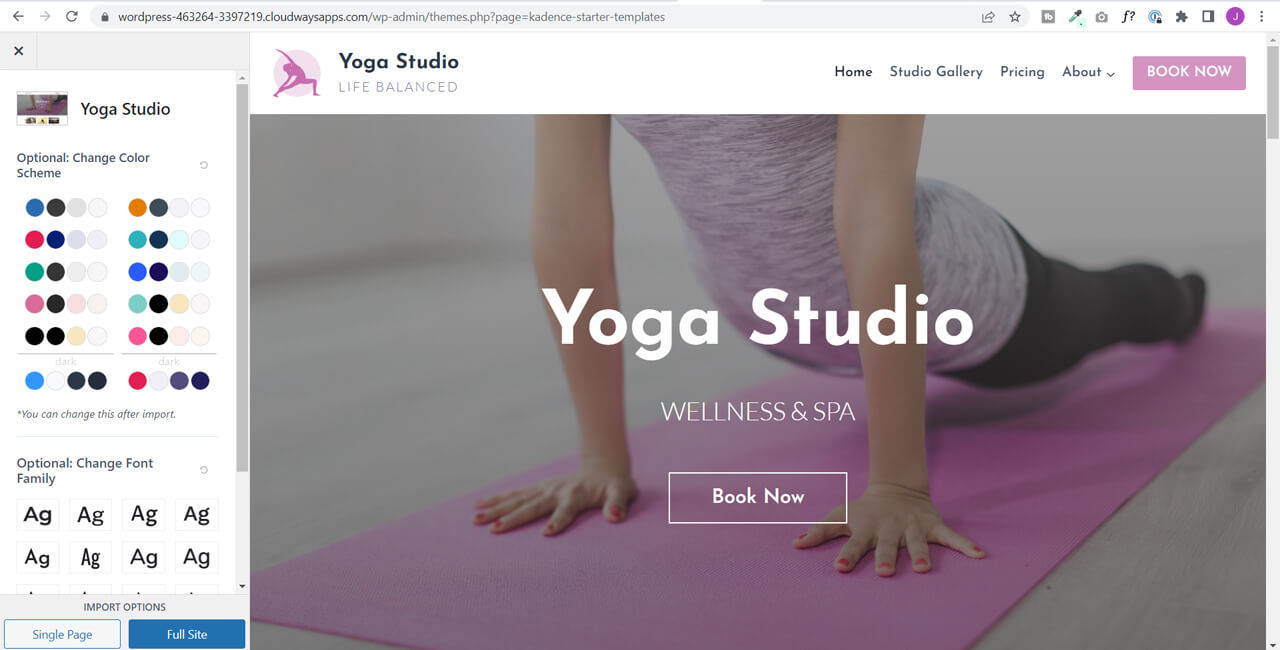
Step-by-Step Guide to Installing Kadence Starter Template
- Decide which starter template to use: Browse all available starter templates on the Kadence website and click through for more details. You can also view the full starter site template in a browser to see the included pages and get design inspiration.
- Ensure an empty WordPress installation: Installing a Kadence Starter Template on a production site will override your customizer settings. It is recommended to start with a fresh WordPress installation.
- Install the Kadence Theme: Navigate to Appearance > Themes and click “Add New” to install the Kadence Theme. You can search for Kadence or scroll down to find it.
- Activate the Kadence Theme: Make Kadence the active theme on your site.
- Install Starter Templates: Go to Appearance > Kadence on the left sidebar of your WordPress admin interface. Click the “Starter Templates” navigation at the top of the page and click the “Install Kadence Starter Templates” button. This will install the Kadence Starter Templates plugin on your WordPress site.
- Find your desired Starter Template: All starter templates available on the Kadence website can be found in the Kadence Starter Template plugin on your site. Choose the template you want to use.
- Choose your color scheme: Select the color scheme you want for your starter template. You can change this later in the customizer.
- Choose your fonts: Pick the font you want to use with your starter template.
- Import the site: Click “Full Site” under import options to import all plugins, content, and images into your WordPress site. This may take a few minutes, so be patient.
- Check out your imported site: After the import is complete, click the “Finished! View your site” button to see your fully imported site.
Although you’ll still need to add your images and content, you have a solid foundation to build an amazing WordPress site supporting your growth ambitions.
Membership Plans and Configuring Plan + Signup Page
ARMember allows you to create a variety of membership plans, and it’s important to properly configure the Plan + Signup Page for a seamless user experience. In this section, we’ll walk you through the process of setting up a signup page with your membership plans. Follow these steps to set up a new plan with ARMember:
Creating a New Membership Plan
- Navigate to the ARMember option on the WordPress menu sidebar.
- Click on “Manage Plans.”
- Press the “Add New Plan” button located at the top right of the screen.
- Fill in the “Plan Name,” “Plan Description,” “Member Role” (the recommended default is the ARMember role), and choose the optional plan for the settings to “Inherit Access Rules Of Membership Plan.”
- Select the “Type & Price.” You can choose from plan types such as Free Plan, Paid Plan (infinite), Paid Plan (finite), or Subscription / Recurring Payment.
- Depending on the plan type chosen, enter the required details:
- For Paid Plan (infinite), enter the price.
- For Paid Plan (finite), specify the Plan Amount, Plan Duration, End Of Term Action, Grace Period End of Term, and Enable Upgrade / Downgrade Action.
- For Subscription / Recurring Payment, provide the Payment Cycles, Trial Period, End Of Term Action, Grace Period End of Term, Payment Failed Action, Grace Period Failed Payment, and Enable Upgrade / Downgrade Action.
- Click “Save” to complete the creation of the plan.
Configuring Plan + Signup Page
After creating your membership plans, you’ll need to set up the Sign-up page. Follow the steps below:
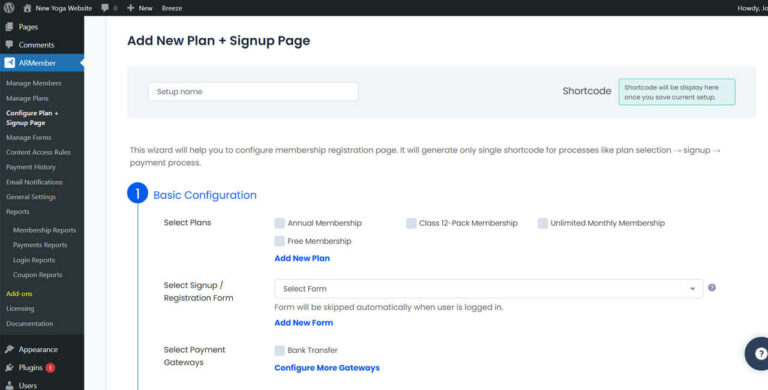
- Select “ARMember” menu item.
- Choose “Configure Plan + Signup Page“.
- Select “Add New Setup” menu button.
- Select the relevant options related to “Basic Configuration“, selecting the “Payment Gateways” and the relevant labels below “Other Options“.
- Choose the “Styling & Formatting“.
- Choose the option to “Preview” to review and once satisfied select “Save” and “Close“.
By completing these steps, you’ll have successfully installed your membership plans and configured the Plan + Signup Page, providing a seamless signup experience for your users.
Configuring Payment Gateways in ARMember
ARMember supports a wide variety of popular payment gateways, ensuring a seamless and secure payment experience for your customers. Navigating to General Settings > Payment Gateways can easily activate and configure these gateways. ARMember also integrates with PCI-compliant billing vendors to keep your customer data safe and secure at all times.
H3: Supported Payment Gateways in ARMember
- PayPal: To accept payments via PayPal, you’ll need your Merchant Email and PayPal Sandbox/Live API information.
- Stripe: Stripe securely collects credit card information from your users to process payments. To activate Stripe, you’ll need the Secret and Publishable Key in your Stripe account settings.
- Authorize.Net: Authorize.Net also accepts credit card payments from your users. To enable it, enter your API Login ID and Transaction Key.
- 2Checkout: To configure and activate 2Checkout in ARMember, obtain your API Username, API Password, Seller Id, Private Key, Publishable Key, and Secret Word by following the steps in “Enable Interaction with 2Checkout.”
- Bank Transfer Payment Method: You can enable the Bank Transfer payment method by simply activating the switch in ARMember. Select the fields you want to include in your payment form, which will then be required on the front end.
- WooCommerce Payment Method: This method requires the WooCommerce plugin to be installed and activated. After activating the plugin, enable the “WooCommerce Integration” module from the ARMember -> Addons page.
- MyCred Points Payment Method: Activate the MyCred Points payment method by enabling the MyCred module from the ARMember -> Addons page.
ARMember also offers additional payment gateway add-ons, including PayPal Pro, Mollie, PagSeguro, PayUmoney, PayStack, Online Worldpay, PayFast, Razorpay, Square, Skrill, and Klarna.
Creating and Modifying Pages with Kadence Theme and Kadence Blocks
The video tutorial briefly covers how to use an existing Kadence Starter template page to add premium video content from a popular Yoga YouTube channel. Since this tutorial primarily focuses on setting up a membership website using ARMember, we do not delve into the intricacies of website design with Kadence Theme and Kadence Blocks.
For those interested in learning more about creating and modifying pages using Kadence Theme and Kadence Blocks, we recommend watching the video tutorial available in the window below. This tutorial will provide you with an introduction to designing and customizing your website using Kadence products.
Setting Content Access Rules and Redirection Rules in ARMember
ARMember provides a straightforward way to restrict access to content on your website based on a visitor’s membership status. With ARMember, you can easily manage content restrictions and tailor them to suit your specific requirements.
Setting Content Access Rules
To access Content Access Rules, follow the steps below:
- Select ARMember menu item.
- Choose Content Access Rules.
- Select the type of content to restrict, such as Post types, tags, taxonomy, Nav Menu, or Other.
- Select the plans to allow access to the type of content.
- Update the rule.
Managing Redirection Rules
To manage redirection rules, follow the steps below:
- Choose ARMember menu option.
- Select General Settings.
- Under General Settings, select the option for Redirection Rule.
- Select the relevant Page/Post Redirection Rules.
- Then choose Save to complete.
By effectively setting content access rules and redirection rules in ARMember, you can create a customized and secure membership experience for your users.
Customizing the Header and Website Menu
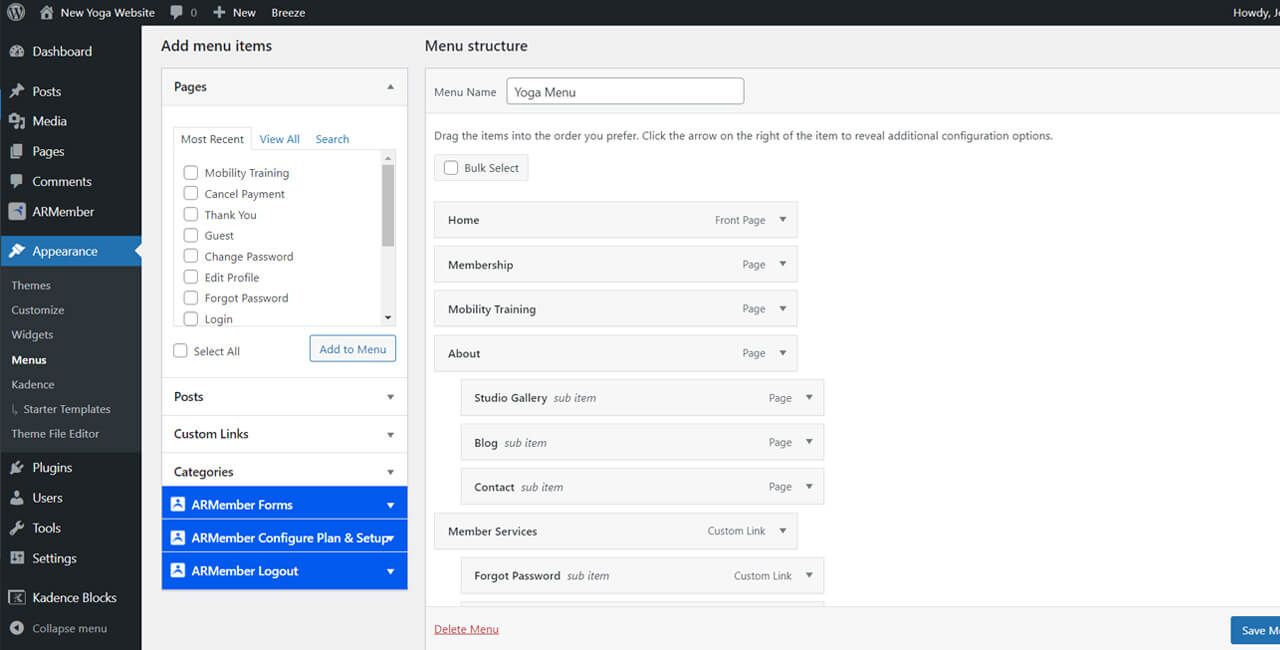
After creating your content and setting up content restrictions, it’s essential to update your website menu to reflect the changes. Kadence offers native options to show or hide menu items based on user roles, and ARMember extends these features by providing unique menu items for a customized member experience, such as options to change passwords, view plans, or log out.
To customize your menu, follow these steps:
- Choose the “Appearance” menu.
- Then select “Menus“.
- Add items to the menu by selecting them on the left.
- Rearrange menu items as desired.
- Click the drop-down arrow next to a menu item and choose the “Hide/Show Menu Item” option to set the membership role relevant to the menu.
- In the Menu Settings, decide whether the menu should be shown as a “Primary“, “Secondary“, “Mobile“, or “Footer” menu item.
- Click “Save Menu” to apply the changes.
By following these steps, you’ll have a customized website menu that provides an optimized experience for your members.
Conclusion
In conclusion, creating a membership website for hospitality providers using Kadence Theme, ARMember, and Presto Player is a seamless process that allows you to provide a unique and engaging experience for your members. By leveraging these tools’ powerful features and customization options, you can easily build a membership site tailored to your niche audience.
From setting up membership plans, configuring payment gateways, and implementing content access rules to customizing the website’s header menu, and incorporating premium video content, you can create an immersive experience that keeps your members coming back for more.
Invest in the growth of your digital empire with Kadence Theme, ARMember, and Presto Player, and enjoy the benefits of a robust membership website that caters to the specific needs of hospitality providers.
How do you envision leveraging the power of membership websites to enhance your hospitality provider’s brand and create a more personalized experience for your members?
Let us know in the comments below!

